在開始看程式前,最好對於 spring MVC 有一些了解,完全不了解的話,可以先看以下兩篇: (CXF 並不會用到 spring MVC,只是我以下的程式有用到,最好了解一下才比較看的懂。)
接下來開始說明怎麼寫第一支 CXF 程式 - Hello World! 先看一下執行結果:
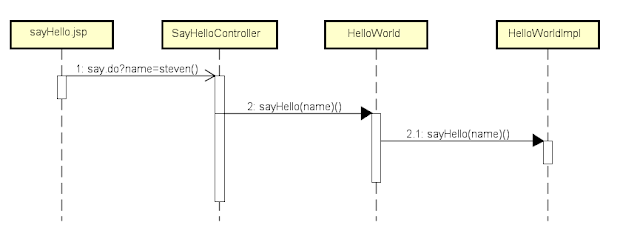
執行的流程如下:
- beans-conf.xml
我將 CXF 相關的設定放在這個設定檔,有兩個設定,分別是 server 和 client,server 中的 implementor 屬性值是後面會實作的服務,client 中的 serviceClass 則是服務的介面,這是很合理的,client 只需知道服務的介面,至於怎麼實作是 server 的事。
<?xml version="1.0" encoding="UTF-8"?>

<beans xmlns="http://www.springframework.org/schema/beans"
    xmlns:xsi="http://www.w3.org/2001/XMLSchema-instance"
    xmlns:beans="http://cxf.apache.org/configuration/beans"
    xmlns:context="http://www.springframework.org/schema/context"
    xmlns:p="http://www.springframework.org/schema/p"
    xmlns:mvc="http://www.springframework.org/schema/mvc"
    xmlns:core="http://cxf.apache.org/core"
    xmlns:jaxws="http://cxf.apache.org/jaxws"
    xsi:schemaLocation="http://www.springframework.org/schema/beans http://www.springframework.org/schema/beans/spring-beans.xsd
        http://cxf.apache.org/configuration/beans http://cxf.apache.org/schemas/configuration/cxf-beans.xsd
        http://www.springframework.org/schema/context http://www.springframework.org/schema/context/spring-context.xsd
        http://www.springframework.org/schema/mvc http://www.springframework.org/schema/mvc/spring-mvc.xsd
        http://cxf.apache.org/core http://cxf.apache.org/schemas/core.xsd
        http://cxf.apache.org/jaxws http://cxf.apache.org/schemas/jaxws.xsd
    ">

    <jaxws:endpoint id="server"
        implementor="idv.steven.cxf.helloworld.HelloWorldImpl" address="http://localhost:9000/CXF/HelloWorld" />

    <jaxws:client id="client"
        serviceClass="idv.steven.cxf.helloworld.HelloWorld"
        address="http://localhost:9000/CXF/HelloWorld" />
</beans>
- mvc-config.xml
這個檔案的設定沒什麼特別,都是 MVC 的基本設定,不了解的話,可以參考上面的那兩篇。
<?xml version="1.0" encoding="UTF-8"?>
<beans xmlns="http://www.springframework.org/schema/beans"
    xmlns:xsi="http://www.w3.org/2001/XMLSchema-instance"
    xmlns:context="http://www.springframework.org/schema/context"
    xmlns:p="http://www.springframework.org/schema/p"
    xmlns:mvc="http://www.springframework.org/schema/mvc"
    xsi:schemaLocation="http://www.springframework.org/schema/beans http://www.springframework.org/schema/beans/spring-beans.xsd
        http://www.springframework.org/schema/context http://www.springframework.org/schema/context/spring-context.xsd
        http://www.springframework.org/schema/mvc http://www.springframework.org/schema/mvc/spring-mvc.xsd"
>

    <context:component-scan base-package="idv.steven.mvc.controller" />
    <mvc:annotation-driven />

    <bean id="viewResolver" class="org.springframework.web.servlet.view.InternalResourceViewResolver"
        p:prefix="/jsp/"
        p:suffix=".jsp"
    />
</beans>
- web.xml
<?xml version="1.0" encoding="UTF-8"?>
<web-app xmlns:xsi="http://www.w3.org/2001/XMLSchema-instance" xmlns="http://xmlns.jcp.org/xml/ns/javaee" xsi:schemaLocation="http://xmlns.jcp.org/xml/ns/javaee http://xmlns.jcp.org/xml/ns/javaee/web-app_3_1.xsd" id="WebApp_ID" version="3.1">
  <display-name>CXF</display-name>

    <context-param>
        <param-name>contextConfigLocation</param-name>
        <param-value>classpath*:beans-config.xml</param-value>
    </context-param>

    <listener>
        <listener-class>org.springframework.web.context.ContextLoaderListener</listener-class>
    </listener>

    <servlet>
        <servlet-name>dispatcherServlet</servlet-name>
        <servlet-class>org.springframework.web.servlet.DispatcherServlet</servlet-class>
        <init-param>
            <param-name>contextConfigLocation</param-name>
            <param-value>classpath:mvc-config.xml</param-value>
        </init-param>
        <load-on-startup>1</load-on-startup>
    </servlet>

    <servlet-mapping>
        <servlet-name>dispatcherServlet</servlet-name>
        <url-pattern>*.do</url-pattern>
    </servlet-mapping>

  <welcome-file-list>
    <welcome-file>index.html</welcome-file>
    <welcome-file>index.htm</welcome-file>
    <welcome-file>index.jsp</welcome-file>
  </welcome-file-list>
</web-app>
- HelloWorld.java
package idv.steven.cxf.helloworld;

import javax.jws.WebParam;
import javax.jws.WebService;

@WebService
public interface HelloWorld {
    String sayHello(@WebParam(name="text") String text);
}
- HelloWorldImpl.java
package idv.steven.cxf.helloworld;

import javax.jws.WebParam;
import javax.jws.WebService;

@WebService(serviceName = "HelloWorld")
public class HelloWorldImpl implements HelloWorld {

    @Override
    public String sayHello(@WebParam(name="text") String text) {
        System.out.println("sayHello called");
        return "Hello " + text + "!";
    }
}
- SayHelloController.java
在 Controller 中要使用 client 端去呼叫 server 端也很簡單,如下綠色部份,用 @Autowired 注入後,如橘色部份呼叫相關 method。
package idv.steven.mvc.controller;

import java.util.HashMap;
import java.util.Map;

import org.springframework.beans.factory.annotation.Autowired;
import org.springframework.stereotype.Controller;
import org.springframework.web.bind.annotation.RequestMapping;
import org.springframework.web.bind.annotation.RequestMethod;
import org.springframework.web.bind.annotation.ResponseBody;

import idv.steven.cxf.helloworld.HelloWorld;

@Controller
public class SayHelloController {
    @Autowired
    private HelloWorld client;

    @RequestMapping(value="/say", method=RequestMethod.GET)
    public @ResponseBody Map<String, Object> getHelloWorld(String name) {
        Map<String, Object> result = new HashMap<String, Object>();
        String respText = client.sayHello(name);
        result.put("result", respText);

        return result;
    }
}
- sayHello.jsp
<%@ page language="java" contentType="text/html; charset=UTF-8" pageEncoding="UTF-8"%> <!DOCTYPE html PUBLIC "-//W3C//DTD HTML 4.01 Transitional//EN" "http://www.w3.org/TR/html4/loose.dtd"> <html> <head> <script type="text/javascript" src="<%=request.getContextPath()%>/js/jquery-3.0.0.min.js"></script> <meta http-equiv="Content-Type" content="text/html; charset=UTF-8"> <title>SayHello</title> <script type="text/javascript"> $(function() { $("#say").bind("click", function(e) { var myUrl = "<%=request.getContextPath()%>/say.do?name=" + $('#name').val(); $.ajax({ type: 'get', url: myUrl, dataType: 'json', success: function(data, result) { alert(data.result); }, error: function() { alert('error'); } }); }); }); </script> </head> <body> <form id="helloForm" name="helloForm" method="post"> Name: <input type="text" id="name" name="name" /> <input type="button" id="say" name="say" value="哈囉"/> </form> </body> </html>
【日劇 - 上野樹里】
上野樹里在「交響情人夢」及「Last Friends」中精彩的演出,讓許多人(包括我)都很期待她的新作品出現,但是… 許多年過去了,她拍的電視劇、電影都沒辦法讓人感受到當年的風采。


沒有留言:
張貼留言